


Stuff I Like - Patagonia Ascentionist 35L Pack
 A Brief History
I’ve been ski touring and climbing in the mountains for most of my life. I’ve bought and used countless packs for a variety of outings. The size, style and shape of each pack reflected the type of trip and the era. The early 70’s were dominated by external frames from Kelty and Jansport. 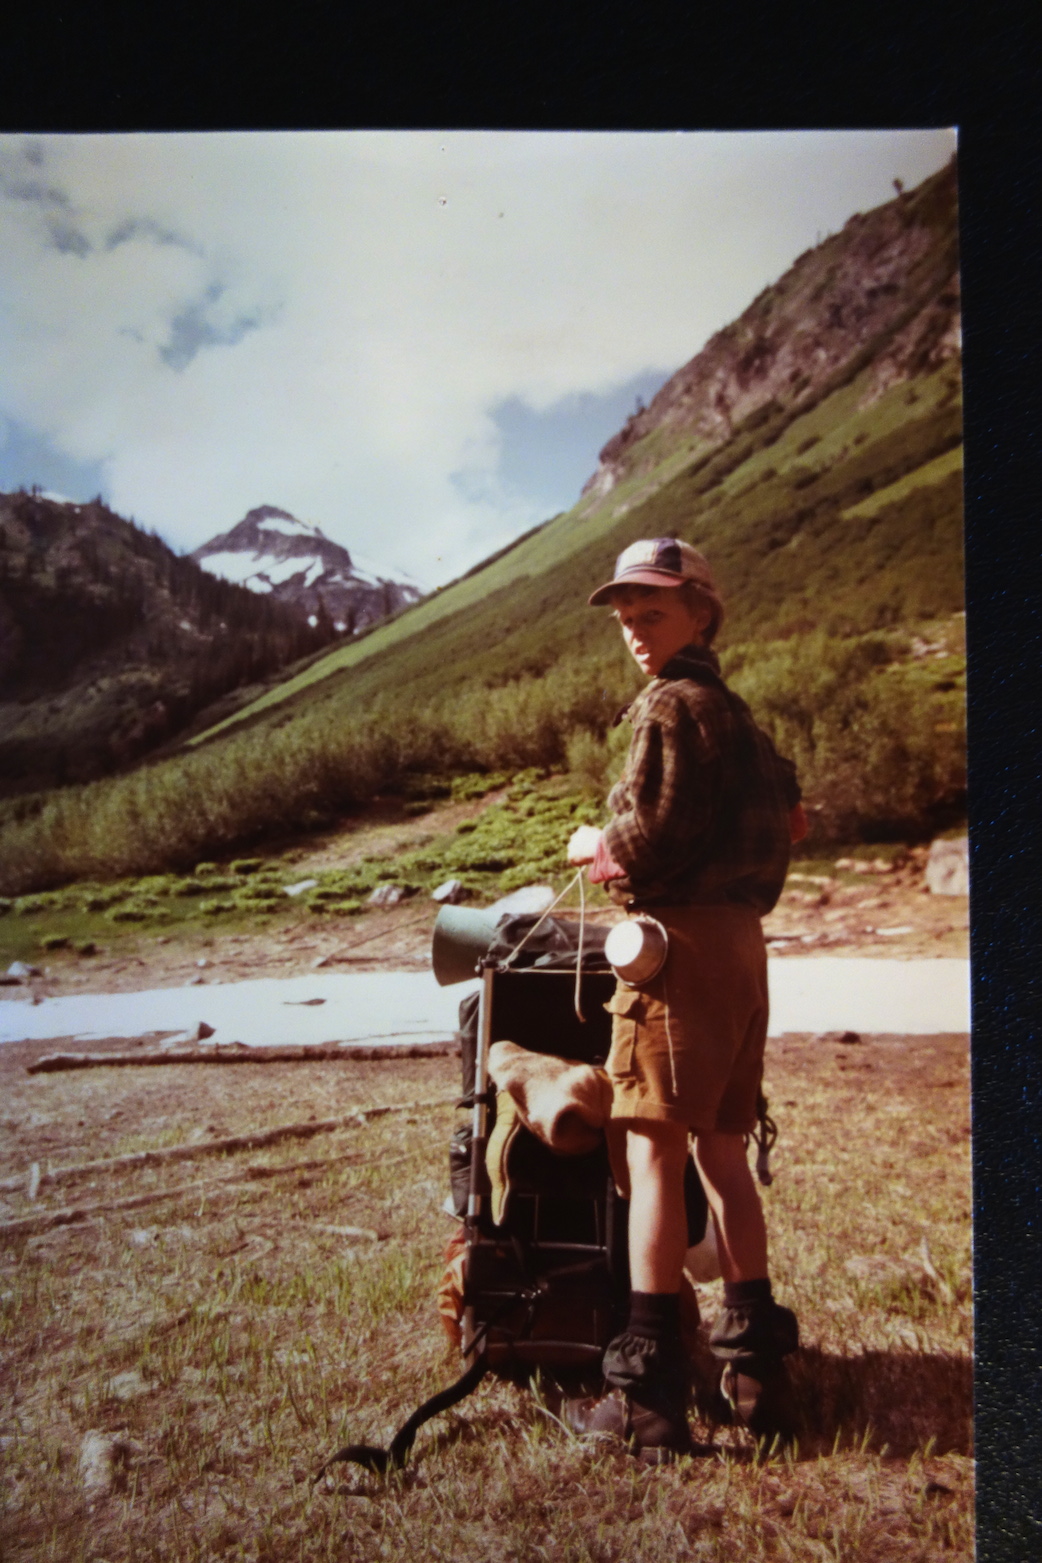 That's a big-ass Kelty frame pack with me rocking the must-have Sierra Cup, circa 1975Internal frames followed and lighter frameless packs had a following. My pack quiver changed as my goals switched from simple backpacking to more climbing-oriented trips. As outdoor pursuits have exploded in popularity in the last decade, packs have become increasingly featured and specialized. From ultralight running packs to ski and climbing packs, outings can be more efficient and fun with the right equipment. That said, I’ve found that simpler is usually better when all factors are considered.
The Scale Doesn’t Lie
The problem with “clever” designs is that they often involve more material and fixtures to make them so. This ultimately adds to the single most important quality in any pack - weight. Anytime you have to carry something in the mountains, weight is the first thing you notice. In my book, comfort and convenience are distant seconds and thirds on the list of what is critical in pack design. Of course, durability is in there somewhere. It doesn’t matter how cool or light a sack is. If it blows apart halfway through your trip, you’re screwed. But with modern materials and reputable manufacturers, durability in the short term is usually adequate. This leaves us with weight and features.
Obviously, weight is directly related to size for any given pack material. For my typical ski mountaineering outing without overnight gear, I want a pack somewhere between 30 and 40 liters. Depending upon the objective, the need for ice tools and other climbing equipment in addition to the usual snow safety and survival gear will demand a bigger bag. Simpler objectives, mild weather and stable conditions might allow for a pack as small as 15 to 20 liters. Bring what you need but nothing more. A full pack carries better.
Feature Frenzy
 In terms of features, today’s typical backcountry skier seems enamored with compartments to store avalanche safety equipment. By definition, these involve additional zippers and pack cloth which typically add one to one and half pounds to the bag. Other “convenience” features like back door entry systems in the rear panel of the pack similarly add weight and complexity with the not so obvious additional points of potential failure. Add to these even more over the top features like breathing devices (Black Diamond Avalung) and inflatable airbags and you could be carrying around an extra ten pounds, perhaps the difference between success and failure on certain objectives.
For the casual user, these features seem nice, even necessary. If you spend part of your day rummaging through your pack for various items at multiple junctures during your tour, the bells and whistles might be worth your additional effort hauling them up the track. If you’re prone to poor judgement on high avalanche danger days or simply want every safety feature you can get then you may feel that these features are not optional. However, for the light and fast ski alpinist pursuing lofty objectives in a particular style, the price for these things is too steep.
Paring It Down
This leaves me a very specific style of pack, one that is devoid of unnecessary compartments and zippers, made from durable enough material to withstand a typical day ascending and skiing down high peaks. The pack needs to be big enough to carry what I need and allow reasonable access to stuff I use throughout the day. It should have the ability to carry skis and ice tools, sometimes simultaneously.
First of all, let me be clear that, in my experience, there seems to be no perfect pack off the shelf. I’ve used many and discarded or destroyed most of them. The ones that have made the grade still required little adjustments, additions and/or subtractions to design. Some of these mods require only a pair of sissors to cleave off the superfluous. Others, the judicious use of needle and thread, sewing machine and Seam Grip. Ultimately, the goal is to get exactly what I want with as few compromises as is practical in a package suitable to the objective.
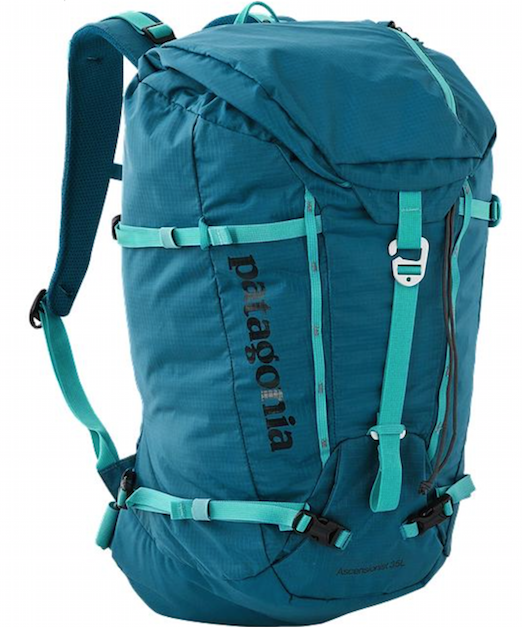 Patagonia has been in the outdoor gear game for almost as long as I’ve been a user. Yvon Chouinard, the company’s original founder, shares my vision of simple but effective gear. The modern iteration of the company employs some of climbing and skiing’s most innovative and forward thinking ambassadors to develop their current product line. I’ve watched with interest as Steve House, arguably one of the modern era’s most successful and ambitious alpinists, has lent his considerable insight toward developing a pack consistent with his philosophy. He and his partners have come up with the Ascensionist 35L and 45L packs.
Originally, I was given the pack as a gift from a friend. He asked me my preference and, after some research, I decided on the Patagonia offering. I was ice climbing again and it seemed ideal. But as my need for a slightly larger ski pack became apparent, I wondered if the Ascentionist could fill the bill with just a few modifications.
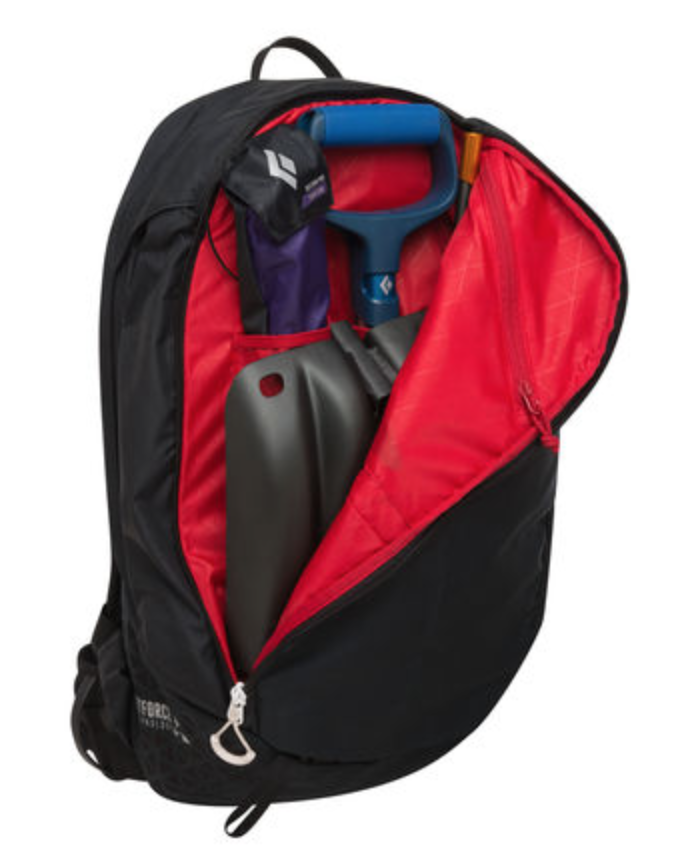
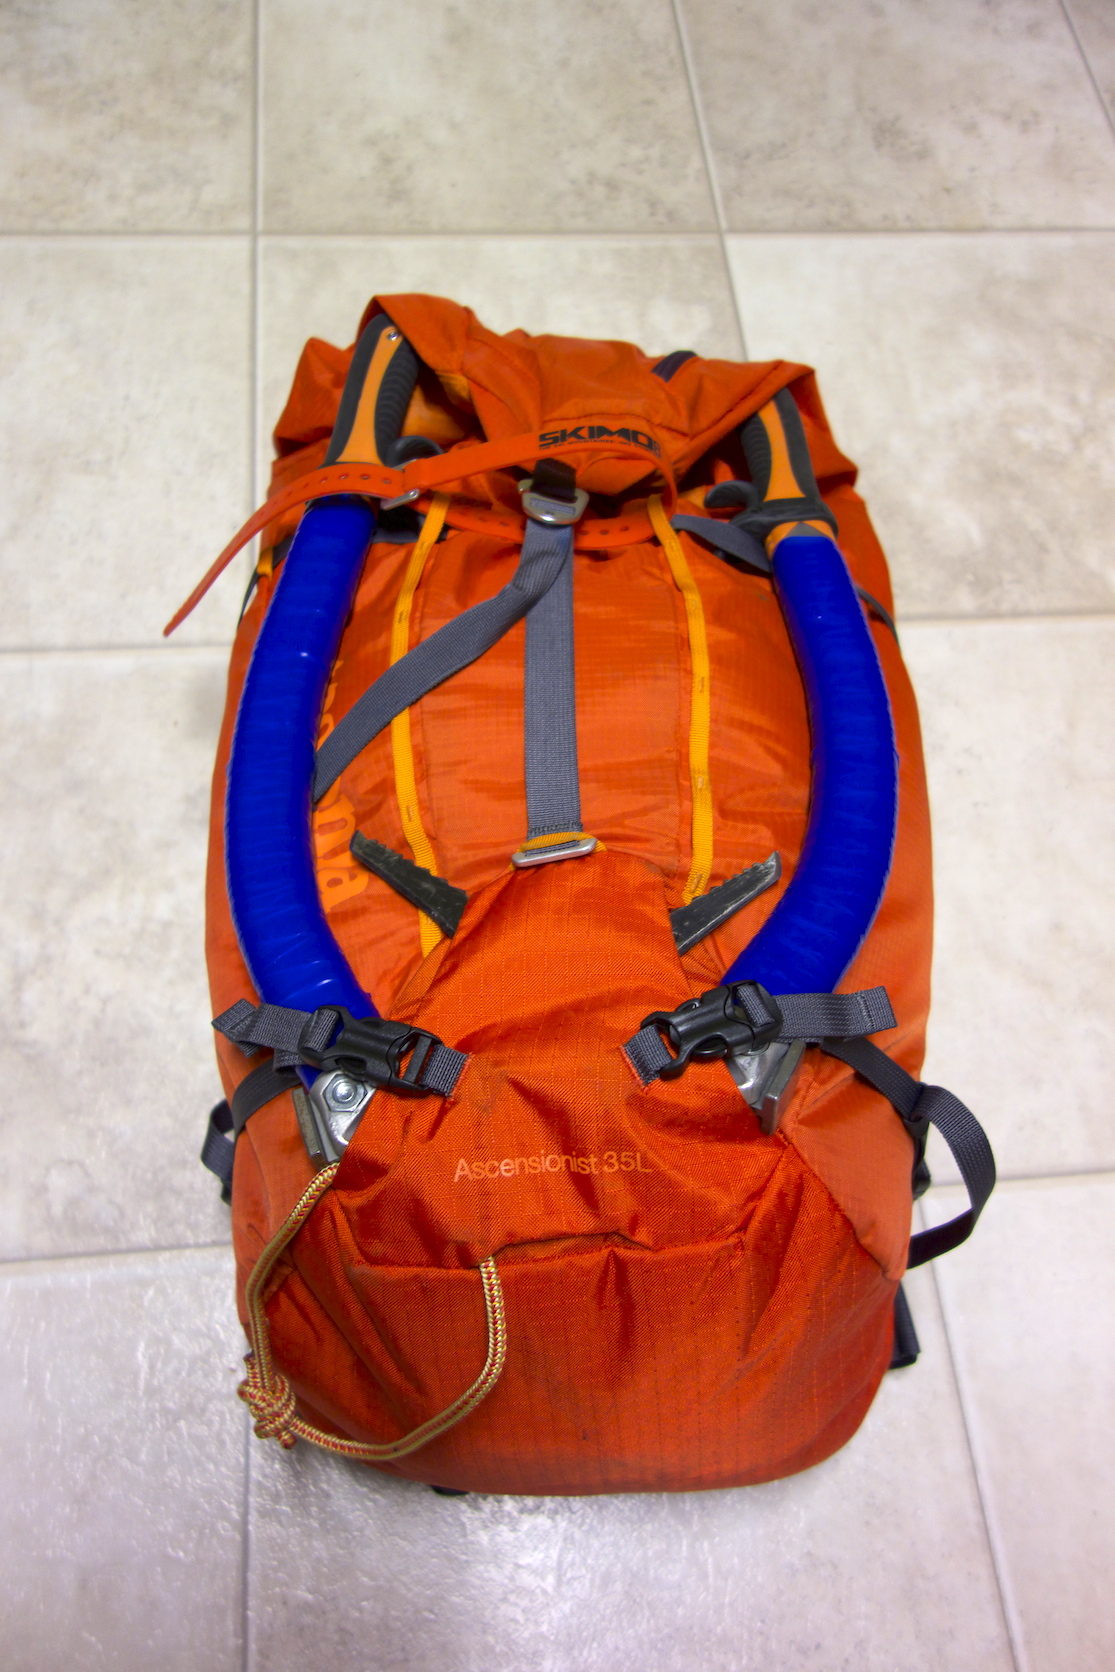 To be honest, it works more than adequately right out of the box. It’s light and built from a robust, modern material that withstands the abuse of rock and gear. It holds ice tools perfectly. It has a single compartment with a simple, attached lid. The minimal frame (143 grams) is light but removable if you favor even more weight reduction. The padded gear loops at the waist are removable, something I favor for most ski days. Fully stripped, mine weights 749 grams. It’ll carry skis in an A-frame configuration but a simple addition of cord to the bottom of the pack allows for my preferred diagonal carry. Additional daisy loops on the face of the main sack allow for additional lash points as needed.
In an era when some makers add do-dads and buckles without thought just to look “technical”, there are a couple of clever features on the Ascensionist that risk going unnoticed by all but the most discerning. First, is the fact that the main lid strap is entirely removable and can be used as an emergency strap of some sort or even a tourniquet, heaven forbid. Second, the plastic buckles that secure the business ends of your ice tools are configured in such a way that a pair of skis can be lashed vertically to the pack requiring only an additional point of fixation up top. Sort of brilliant. Of course, if you’re on a mission requiring skis AND tools this feature is not useable. But still…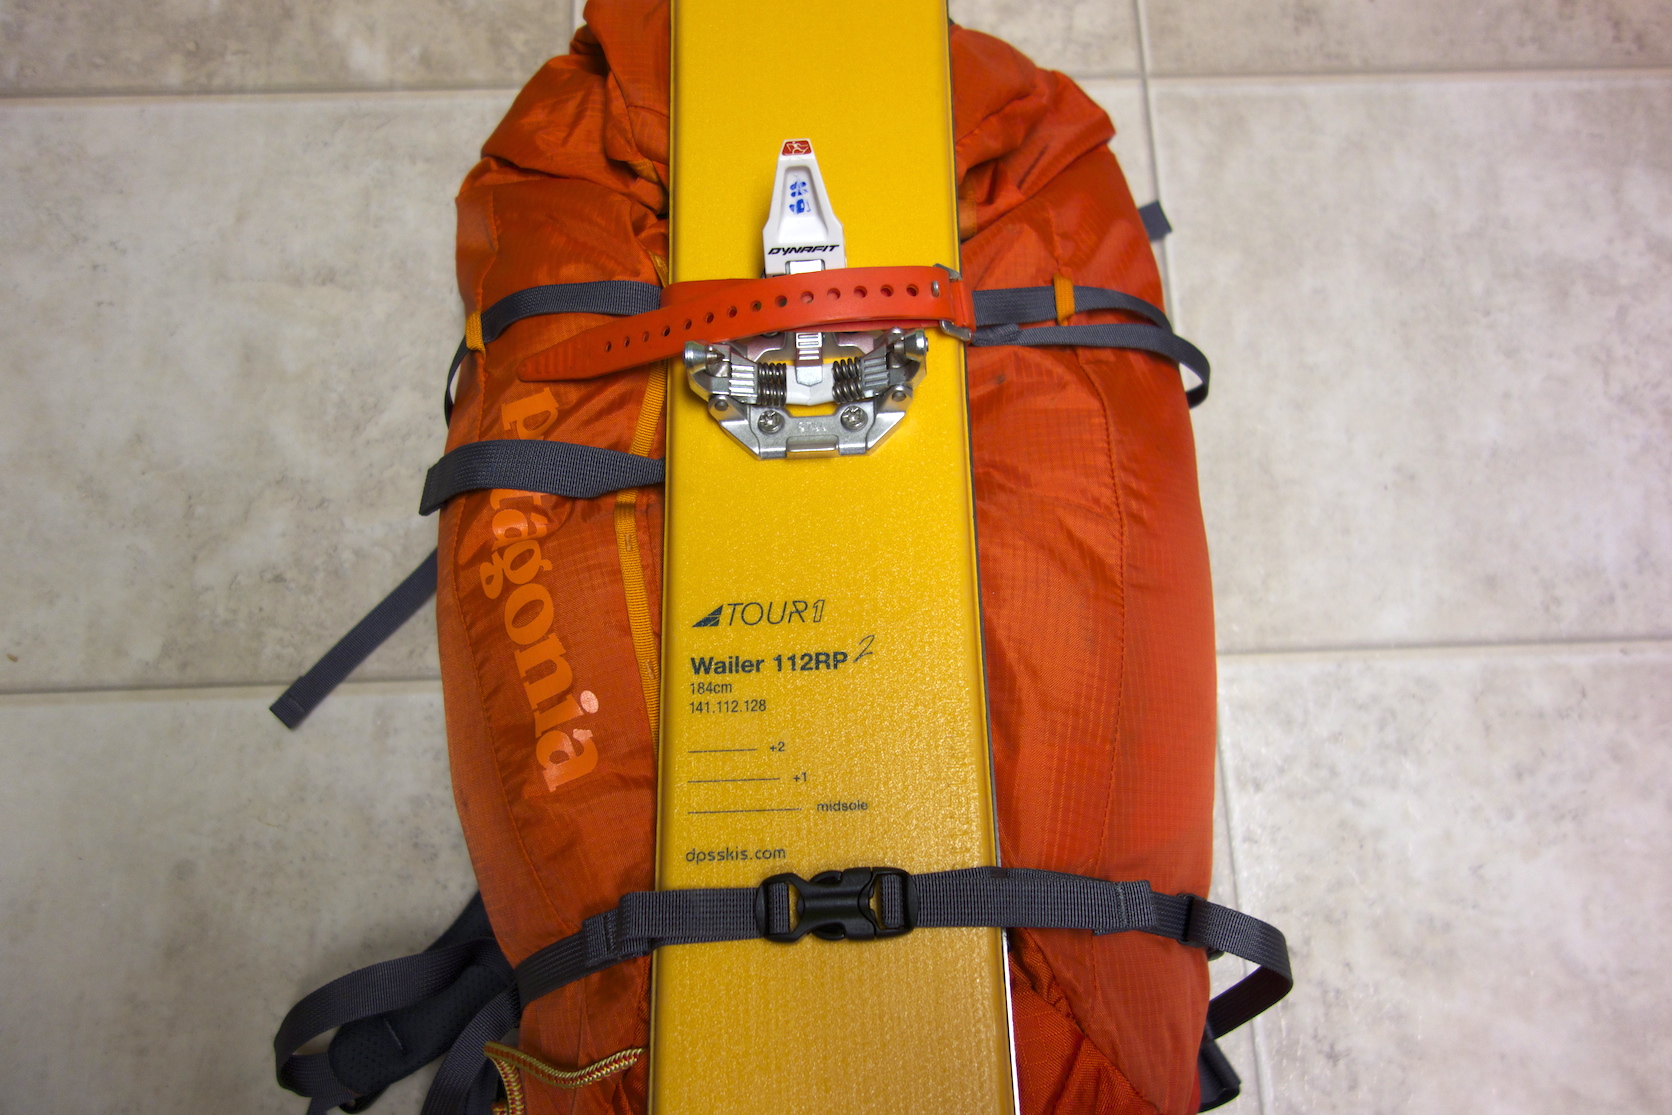
Making It Better
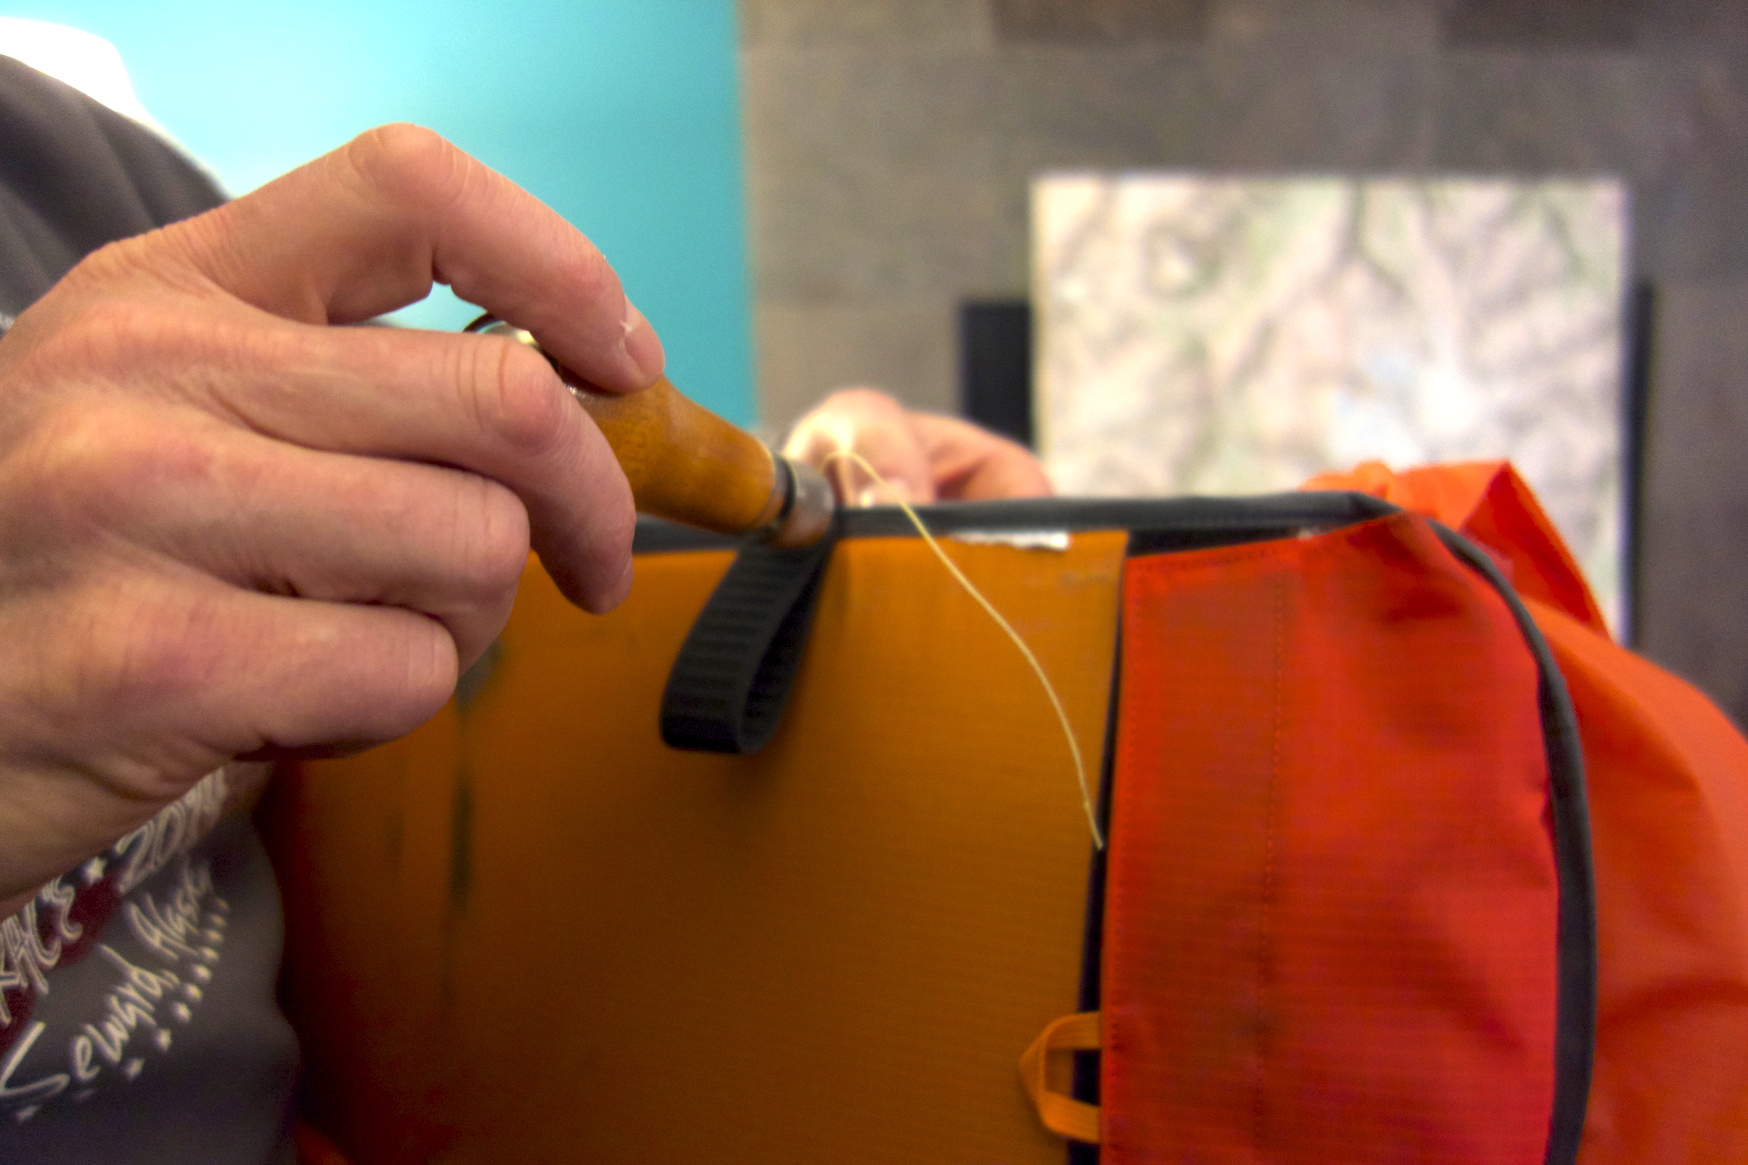
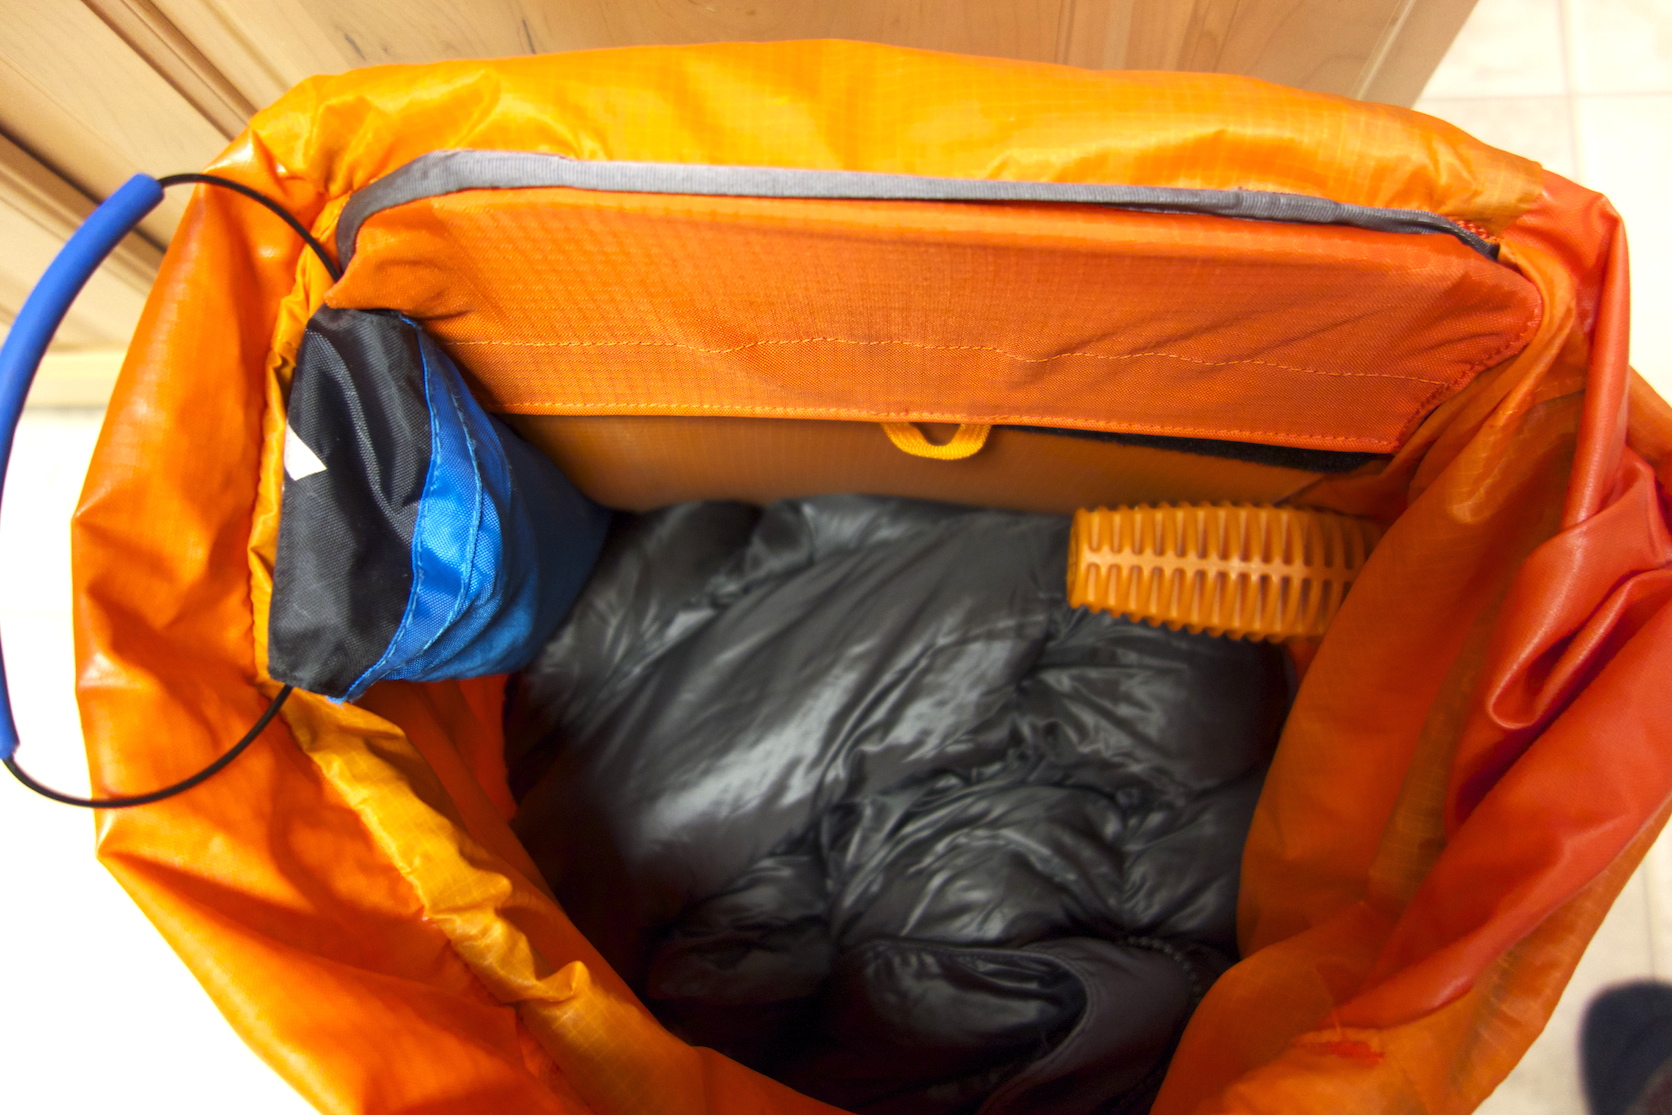 The puffy keeps things tidyFor the obsessive-compulsive skiers out there, the lack of a separate compartment for avy gear might be a deal breaker. Sad but true. For me, my big puffy that lives at the bottom of my pack with a few other survival items that also rarely see the light of day works perfectly to secure these things out of the way. To make this slightly tidier, I’ve added two nearly weightless elastic loops running down the edge of the back pad through which I pass my shovel handle on one side and my probe on the other. The shovel blade simply rests against the back pad, pinned there by the other stuff.
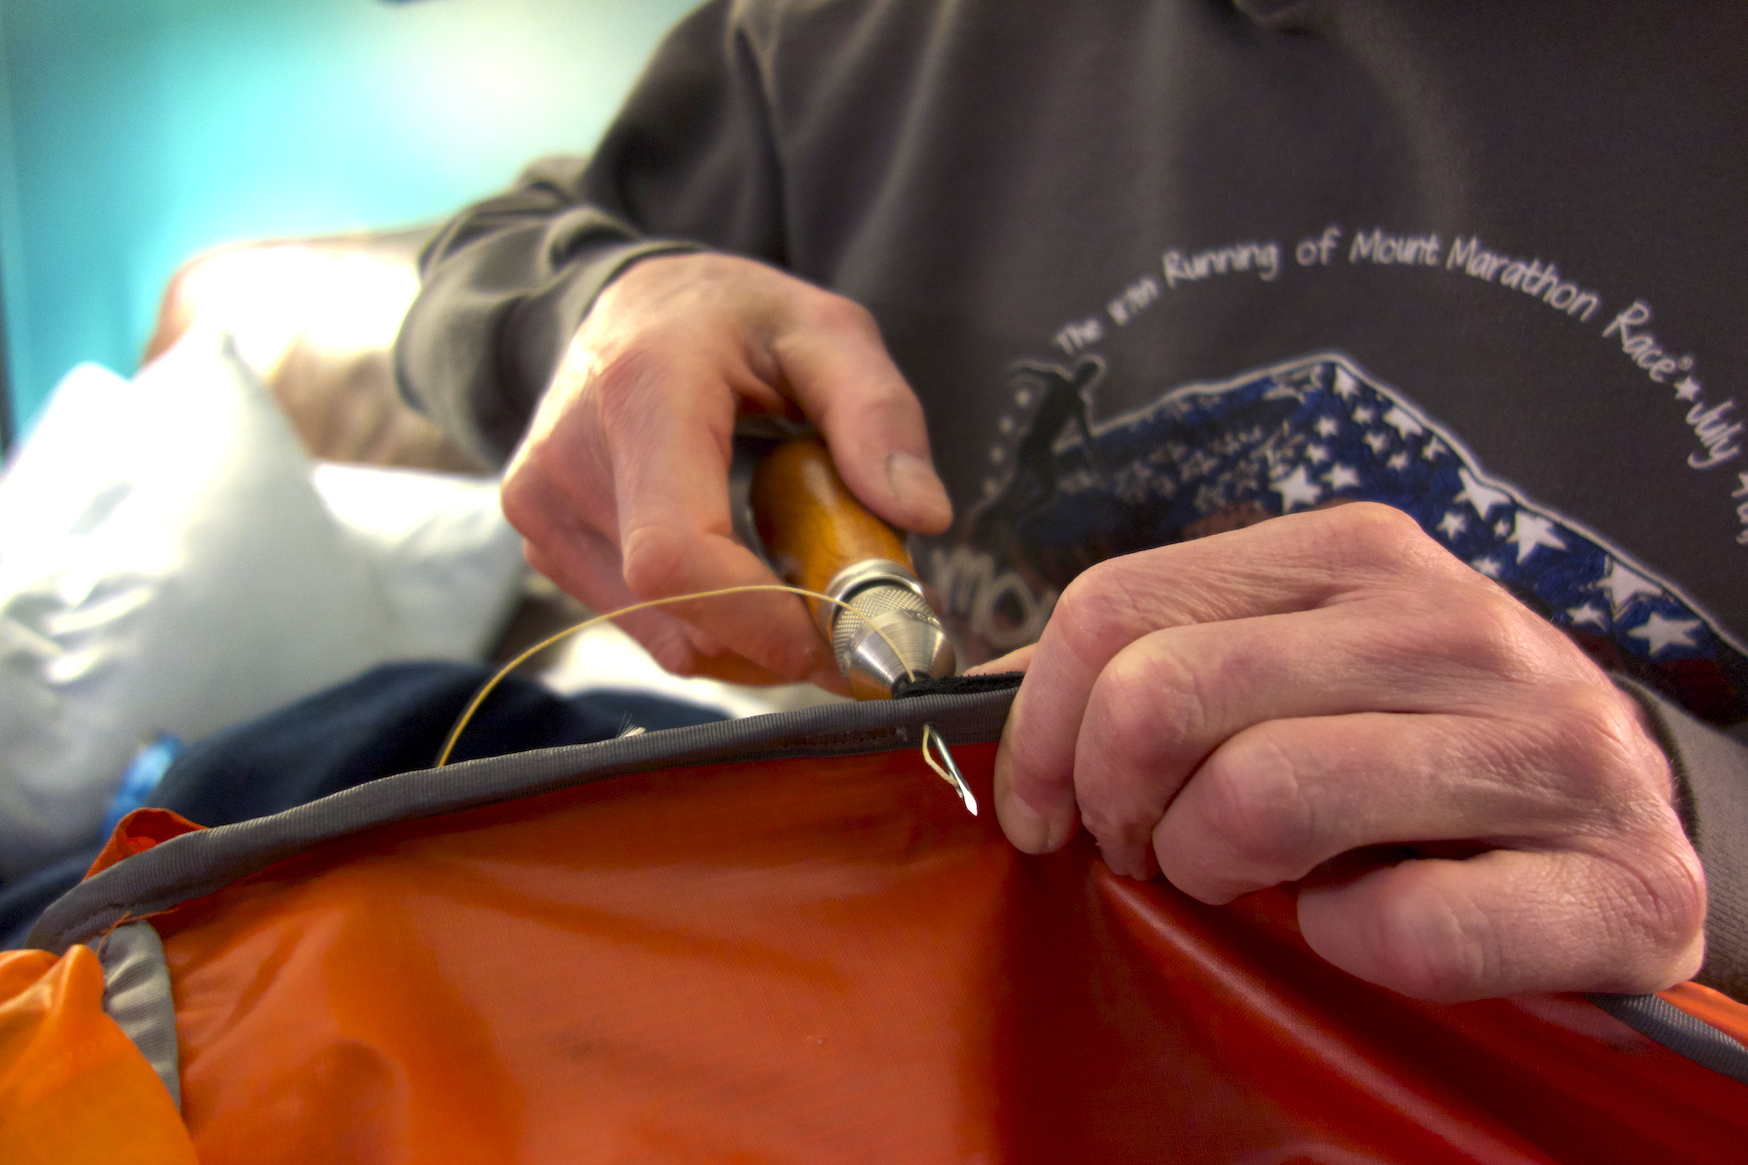 Putting the Speedy Stitcher to use
 Just a touch betterTo facilitate a diagonal ski carry system, I’ve added a loop of 5mm accessory cord to the bottom at the ice tool attachment. When booting, I just drop the skis through the loop and secure the other end to the upper most daisy chain with a strap. Lacking a strap, the side compression feature can be used to secure the skis.
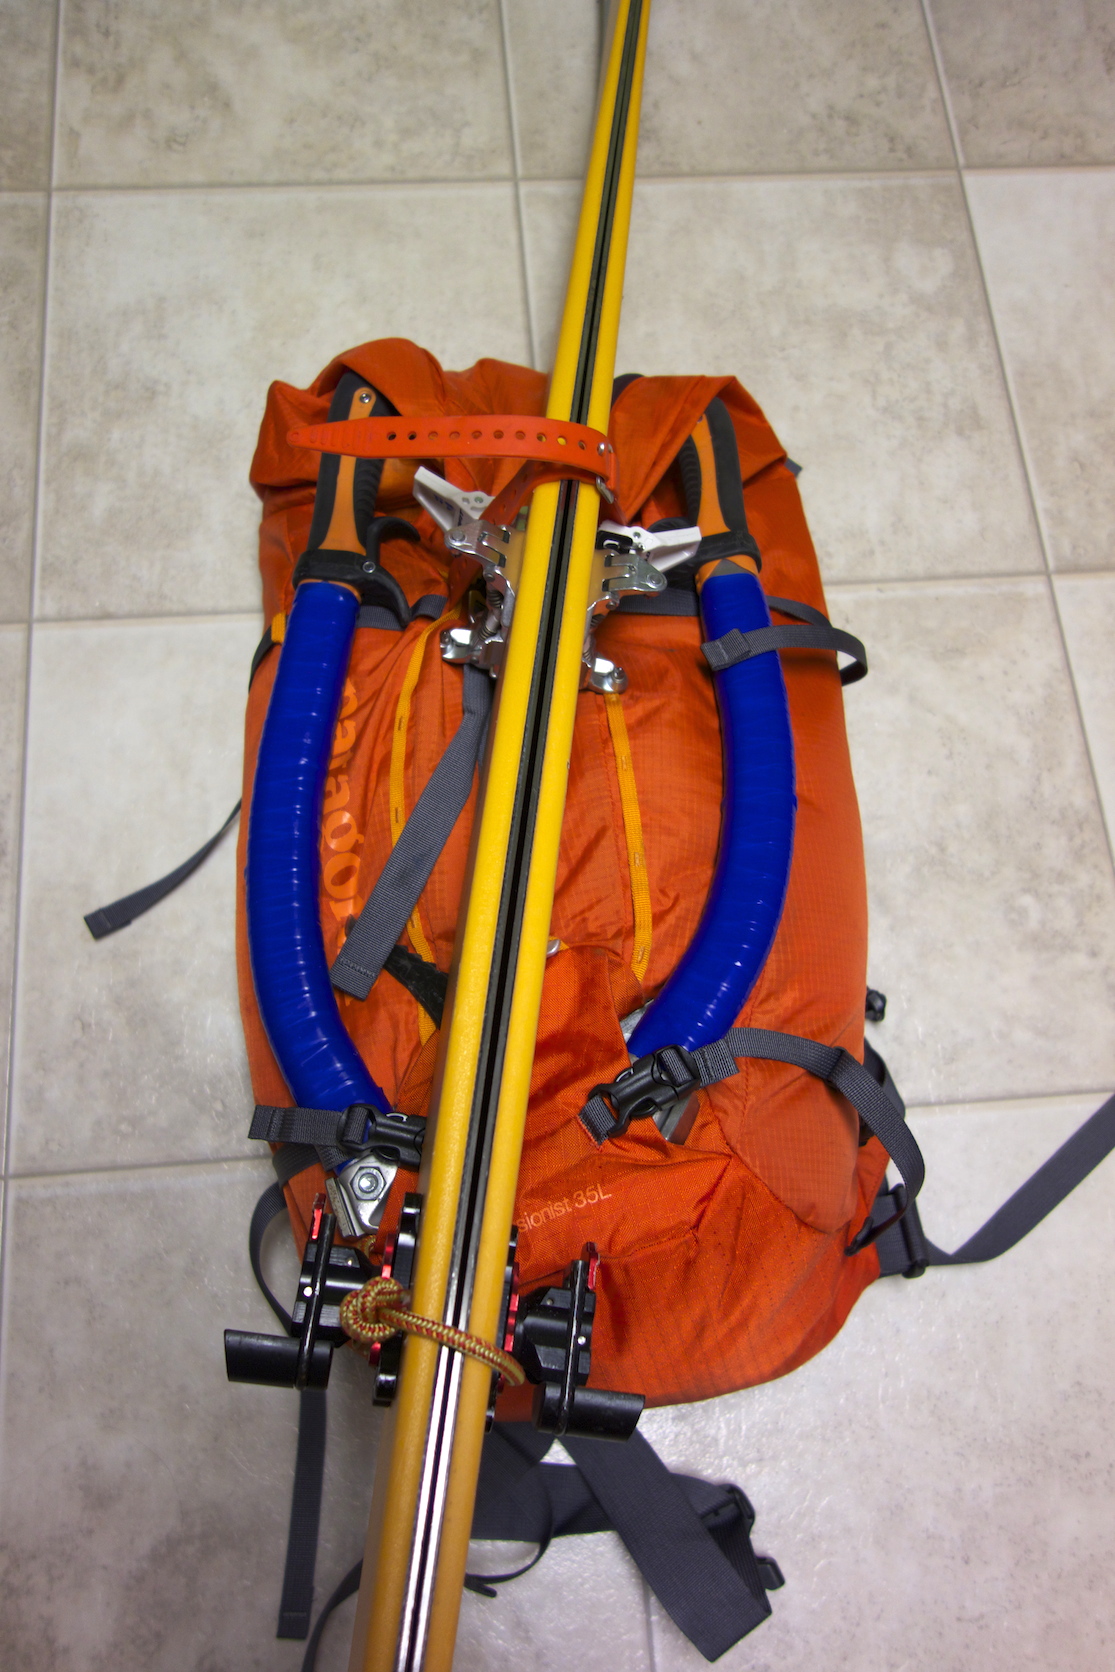
I’ve been told the next generation of the Ascensionist is on the drawing board as I write this. It’ll be interesting to see what’s new. In my perfect world, a light pack like this with some version of the Jet Force air bag system employed by Pieps and Black Diamond packs just might have me using such a thing on certain missions, mostly solo. But it’s likely that complicated patent issues are at play here so it’s hard to know if and when this dream will be realized. Until then, I’ll try to use my head, pick conditions and objectives intelligently and pursue them with the right gear loaded into my Ascensionist 35L pack.
 Gear
Gear
Reader Comments (8)
Hey Brian,
Good stuff today. One question, crampons in or out? I jettisoned a crampon into a crevasse due to an external attachment once.
Thanks,
-rw
Good question. With the right kind of straps, Voile or a custom Fastex straps (which I'm making), I think putting spikes on the outside is fine. Many guys, me included, have used bungee for this and I agree with you, it can be sketchy. But the daisy chains on the outside of this pack are pretty sweet and would accept two straps to securely lash spikes on the back. That said, I often put them inside if space allows and especially with my Grivel Haute Routes which are small and pack down. I guess it depends on space available and the type of spikes you're toting.
Thanks, mate. Both for this post and for the earlier guidance to purchase this pack. (I got mine in emergency green, because, well, chartreuse is the new black). I have to kinda disagree on the main lid strap. Mine self-ejected 3x on my first trip. Fussy and unnecessary. I think that if I need a tourniquet, I would not be in the frame of mind to say to myself "Hey, that lid strap could be removed and used to stanch blood loss!" Maybe. I'm thinking of doing a light retention stitch over the little metal wing anchor. Again, maybe. And, personally, I'd prefer the minimal additional weight penalty for a dedicated ski carry system. I, too, installed a loop through the axe sleeve, but found it carried like shit with a partially-loaded sac. Didn't think of the vertical carry option (although I'd be concerned about slicing through any of the straps with ice-tuned ski edges... they are light, not durable.
Overall, I'm with you. A rock solid pack, but one that requires fussing... albeit WAY less than the average post-purchase mod session!
(By the way, I still have, and use, that old Wild Things Andanista you steered me towards for our first trip to Denali's West Rib. At this point, it is more of a lovely anachronism... but what a remarkable pack for its day!)
O+O... and thanks, as always, for the outstanding guidance and iconoclastic, self-guinea-pigging behavior. Well played.
Good comments, all. I wonder if there is some variable sewing going on at the factory. Interesting that your's simply came off. Not good, either. You also said that you could slide the buckle of the side compression strap out from under its little guide loop. I cannot on mine. Again, sounds like a quality control issue.
Yes, the diagonal carry is a bit of a pain the pack is not full but the strap at the middle daisies seems to fix that. You can also remedy it with some creative routing of the main lid strap around the side strap and back while looping around the skis.
As for sharp edges cutting straps...yes, possible but with bases facing one another, less likely. Plus, I'm a fan of leaving skins on my skis when I transition from skinning to booting. Even if I'm skiing down at the top of the boot pack, having skins on while stepping in is far more secure and less fussy with tech bindings. Then I rip the hides and go.
Yep, I've given John Bouchard props in these pages before. Loved that Wild Things pack. Shit, if Mugs could have a pink/purple one, I could, too. Can't leave Randy Ratcliff off the list of game changers, either. I still have a Cold Cold World Chernobyl. We all stand on their shoulders.
"Even if I'm skiing down at the top of the boot pack, having skins on while stepping in is far more secure and less fussy with tech bindings."
Great idea. Maybe too time consuming or too much of a hassle if you transition from skin to boot in temps and wind that is much milder than where you'll go from boot to descent. But a great tip.
Curious if you've looked at Dynafit's Cho Oyu 35. It seems to be well within the weight and size range of the Ascensionist 35. Diagonal ski carry works well.
Trent,
Certainly the temptation is there as you start to put your skis on your pack to rip skins right then. I'd argue that most do this. However, those same people are often seen fiddling with the slippery bastards at the top and we all know how tedious that can be to get into tech bindings, especially if the position is awkward. The important caveat here if you do as I do is that you must be proficient at skimo skin rips and not be burdened by a BD or G3 skins that rip from the tail. Hell, those people take their skis off to rip skins on simple powder laps half the time. Just another reason to rip from the tip.
As for the larger Dynafit packs, I haven't tried them or even held them in my hands. I trust they are quite good. I used their race pack years ago and it was great. Hmmm, just what I need. Another pack. Ummm, yes, please!
The Ascentionist does make me dream, maybe someday. Thanks for the review
Funny to hear about the Wild Thing pack. I have it too and am still using it often! What a pack.
For ski adventure, I use the Camp X3 600 which is awesome but probably way more fragile than the Ascentionist.
I've been a big fan of the Camp packs although they require earlier applications of Seamgrip than some others. You can't be that light without giving up something. I have one that's in good shape but my girlfriend has adopted it and I'm not going to argue with her. It makes her faster all the way around and she likes that.